
- Excellent Customer Service
- Established & Accredited
- Fully Insured & Public Liability
- Highly Rated - 5 Star Reviews
- 24/7 Emergency Call Out
How Long Does Penetrating Damp Take to Dry Out?
Wondering why that damp patch is still hanging around like an unwanted guest? On average, penetrating damp takes anywhere from a couple of weeks to several months to dry out, depending on the severity and the materials involved. It can be stubborn, slow-moving, and a bit sneaky if left unchecked. Unlike a quick splash on the wall, this kind of moisture intrusion doesn’t go away with a bit of sunshine and wishful thinking—it demands attention, action, and sometimes professional support.
In this guide, we’ll unpack exactly what penetrating damp is, how it differs from rising damp, and what affects drying time. You’ll also learn how to speed things up, avoid common mistakes, and know when it’s truly safe to redecorate.
Let’s get into it—and dry this problem out for good.
What Is Penetrating Damp?
Penetrating damp—also known as lateral damp—occurs when water infiltrates through the external fabric of a building. Rather than coming up from the ground (like rising damp), it seeps in sideways, usually due to structural issues, defective brickwork, or poor weatherproofing.
Think of it this way: your walls are supposed to be like a waterproof coat. If there’s a rip—say, a cracked tile or crumbling mortar—water gets in, and it lingers. Unlike condensation or humidity-related damp, penetrating damp tends to localise on a specific area and worsen after heavy rain.
📌 Key facts:
Can affect any height on a building—not just ground level
Worsens in wet climates or after prolonged rain
More common in older homes with degraded exterior protection
Affects brickwork, stone, render, and even concrete if compromised
How It Differs from Rising Damp
It’s easy to confuse penetrating damp with its infamous cousin, rising damp—but they’re fundamentally different in behaviour, source, and treatment.
Feature | Penetrating Damp | Rising Damp |
|---|---|---|
Moisture Direction | Horizontal/lateral through walls | Vertical, drawn up from the ground |
Location | Any height—often around windows, roofs | Bottom metre of internal walls |
Cause | Leaky gutters, cracks, porous brickwork | Lack or failure of a damp-proof course |
Weather Link | Often worse in rainy or stormy conditions | Less influenced by immediate weather |
Appearance | Localised patches, sometimes brown or green | Tidemarks and flaky paint near skirting boards |
💡Tip: If the damp is halfway up the wall and doesn’t follow a straight “rising” line—it’s likely penetrating damp.
Common Entry Points for Moisture
Think of your home like a shield against the elements. Now imagine small chinks in that armor—that’s where penetrating damp sneaks in. Identifying these access points is key to stopping moisture in its tracks.
🧱 External Walls
Cracked brickwork or damaged mortar joints allow rain to seep straight in
Porous render or untreated stone can absorb water like a sponge
Hairline fractures may look harmless but act like capillaries for moisture
🏠 Roofing Issues
Missing or slipped tiles are classic damp gateways—especially in older roofs
Faulty flashing around chimneys or skylights can allow water to leak beneath
Clogged or damaged gutters overflow, sending water down walls instead of away
🪟 Windows and Doors
Perished seals or gaps in the frame are prime infiltration zones
Water can also seep in around poorly installed lintels or ledges
Drip grooves missing from sills? Rainwater runs right into your wall
🕵️♀️ Next time it rains, grab a torch and check these areas—you might spot the source in action.
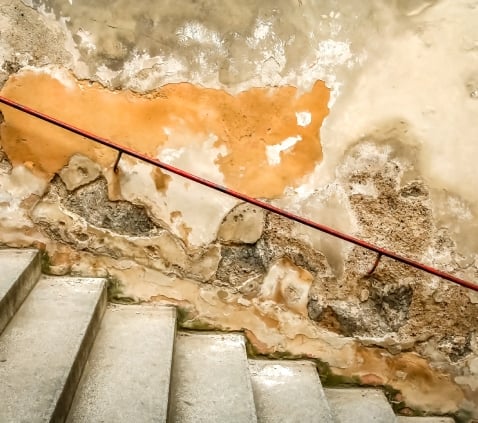
Signs and Causes of Penetrating Damp
So you’ve spotted a damp patch. The question is: what caused it, and how can you be sure it’s lateral moisture intrusion and not something else?
Visual Symptoms to Look Out For
Penetrating damp often makes itself known in distinct, visible ways. Keep an eye out for:
Dark, irregular patches on internal or external walls
Discoloration (brown, green, or even black if mold has taken hold)
Peeling paint or bubbling plaster, especially in corners or near ceilings
Salt deposits (efflorescence) that look like white powdery stains
Cold, damp-feeling walls that stay clammy despite heating
These aren’t just cosmetic problems—they suggest ongoing moisture activity that could worsen over time.
Weather-related and Structural Causes
Penetrating damp is often triggered by a combination of external weather conditions and building faults.
🌧️ Weather Triggers:
Heavy or prolonged rainfall
Freeze-thaw cycles that expand cracks
Wind-driven rain on exposed facades
🏚️ Structural Factors:
Deteriorated render or mortar
Leaky roofs or broken flashing
Blocked drainage systems
Poorly maintained windows or doors
If both conditions align—moisture has a clear path inside.
When Damp Appears on Internal vs External Walls
Knowing where the damp appears can reveal the cause:
Internal walls
Often result from moisture tracking through the building envelope
Common in shared party walls, chimney stacks, or around window recesses
External walls
Show signs like moss, algae, or staining
Signal that the wall is absorbing water and needs weatherproofing
How Long Does It Take to Dry Out?
So, the leak is sorted, the source sealed… and now? You wait. But how long exactly should it take for penetrating damp to dry out?
The truth is, there’s no fixed timeline. Drying depends on the depth of saturation, the materials involved, and the drying conditions you create. Still, there are reliable benchmarks you can expect.
Typical Drying Timeframes for Penetrating Damp
Most properties fall into one of these three scenarios:
Minor surface damp – 1 to 2 weeks
Moderate damage with plaster affected – 3 to 6 weeks
Severe or long-term water ingress – 2 to 3+ months
🔎 General rule: allow around 1 inch of wall thickness per month for solid walls to dry fully.
Factors That Influence Drying Duration
The drying pace isn’t just about time—it’s about conditions. These factors play a big role:
Wall type: solid walls hold more moisture than cavity ones
Material: stone and render dry slower than brick
Depth of damp: longer exposure = deeper saturation
Airflow and temperature: warm, dry air speeds evaporation
Humidity: high levels slow drying significantly
Equipment: fans and dehumidifiers can cut weeks off the timeline
💡 If insulation or plasterboard is affected behind the wall, drying can take even longer—and may require removal.
When You Can Expect Visible Results
While deeper layers take time, surface signs usually improve sooner. In the first 7 to 10 days, you might notice:
Patches begin to fade or lighten
Walls feel less clammy or cold
The smell of damp or mildew starts to ease off
But remember—what looks dry might still be wet underneath. Trust your readings, not just your eyes. For full confidence, Ex10 can carry out moisture checks to confirm if it’s safe to move forward.
Speeding Up the Drying Process
Drying out takes time, but you don’t have to just sit and wait. With the right steps, you can speed things up and stop damp from settling in deeper than it already has.
Immediate Actions to Take
A few smart tweaks to your environment can make a big difference early on.
Ventilate the space – Open windows, activate air bricks, and keep doors ajar for better circulation
Use dehumidifiers and fans – A quality dehumidifier pulls moisture from the air, while fans keep it moving evenly
Remove moisture-trapping materials – Strip wallpaper, move furniture away, and cut out wet plaster or insulation if needed
Professional Tools and Treatments
When drying stalls or the damage runs deep, specialist equipment can help finish the job properly.
🛠️ Industrial-grade dehumidifiers for serious saturation
🔥 Infrared heaters to dry walls from the inside out
📸 Thermal imaging to find moisture you can’t see
🧪 Salt neutralisers to stop surface decay
🦠 Antimicrobial sprays to prevent mould regrowth
Mistakes to Avoid
Pushing too hard—or too soon—can backfire. Avoid these common missteps:
Painting or sealing before the wall is fully dry
Using vinyl paints or wallpaper that trap moisture
Relying only on heat, which can drive damp deeper
Ignoring the cause—drying the symptom won’t solve the problem
Let the wall dry thoroughly—not just on the surface.
Treatment Options and Long-Term Fixes
Drying the wall is just the beginning. To stop penetrating damp from coming back, you’ll need to repair the damage, seal up weak points, and future-proof your space—inside and out.
Repairing External Damage
Penetrating damp often starts with small exterior faults. Fixing these restores your home’s first line of defence against rain.
🧱 Repoint cracked or eroded mortar
🧱 Replace spalled or damaged bricks
💧 Clear and realign gutters and downpipes
💧 Repair cracked roof tiles or flashing
🪟 Reseal gaps around windows and doors
Waterproofing Measures for Prevention
Once repairs are done, it’s time to boost your home’s resilience with water-repellent upgrades that still let walls breathe.
🧴 Apply breathable masonry cream to reduce water absorption
🌬️ Maintain drip grooves and roof overhangs to divert rainfall
🔧 Ensure flashings, vents, and drainage systems are working properly
Internal Wall Treatments After Drying
Inside the home, restoration should only begin when you’re sure the wall is completely dry. Cutting corners here often leads to repeat problems.
🧱 Use salt-resistant or renovating plaster for lasting results
🎨 Choose breathable paints and anti-mould primers
🧼 Treat surfaces with a fungicidal wash if mould was present
Not sure the wall is ready? Ex10 can check it for you before you redecorate—so you don’t waste time or paint.
How to Tell When the Wall Is Fully Dry
Looks can deceive—especially when it comes to damp. A wall may feel dry to the touch, look cleaner, or stop smelling musty… but that doesn’t always mean it’s ready for plaster or paint. Hidden moisture deep within the wall can still cause bubbling, mould, or flaking long after the surface appears fine.
So how do you know it’s really dry? Let’s break it down.
Moisture Meter Readings
This is the most reliable method—and the one professionals trust. Moisture meters detect what’s going on beneath the surface, where damp tends to linger longest.
Use either a pin-type (inserted into the wall) or a pinless scanner (non-invasive). Here’s how to get an accurate reading:
Readings below 18–20% moisture content are typically considered safe for decoration
Always test multiple points across the affected area—check both high and low, and at different depths
Compare readings on a nearby known dry wall to spot discrepancies
📏 Pro tip: Log readings over a few days to ensure they’re stable and not just temporarily lower from heating or airflow.
Visual and Physical Checks
Your senses can still tell you a lot—if you know what to look for. A wall that’s drying out properly will begin to behave and appear differently over time.
Here’s what to check:
A consistent colour tone—no darker, shadowy patches
No signs of paint bubbling, plaster peeling, or efflorescence (white powdery deposits)
Wall feels cool, but not damp or clammy to the touch
No lingering musty smell or recurring mould in previously affected areas
👃 Still smells damp after ventilation and cleaning? Moisture may still be present deep within the wall or behind insulation.
Replastering and Painting—When It’s Safe to Proceed
You’re eager to make the space feel fresh again—but don’t reach for the roller just yet. Decorating too early can trap in moisture and undo all your hard work.
Before you apply that first coat:
🧱 Replaster only after removing all affected material and confirming the substrate is dry
🎨 Start with a breathable mist coat—avoid vinyl or plastic-based paints initially
⏳ Allow an extra two weeks beyond when the wall appears dry—especially in colder months or poorly ventilated rooms
🎯 When in doubt, grab a moisture meter—or better yet, call in Ex10 for a professional check.
Final Thoughts
Penetrating damp isn’t just a surface issue—it’s a structural threat that worsens over time. Now that you know what causes it, how to treat it, and when it’s safe to redecorate, don’t let uncertainty delay action.
At Ex10, we diagnose, dry, and fix penetrating damp for good. Whether you need a professional survey, urgent repairs, or expert advice—call us today and get it sorted properly the first time.
Let’s get your home dry, safe, and future-proof.
📞 : 01202 618374
Contact Us